More Tips
| Salt
and sand can damage the car's paint. Give your car a thorough cleaning and wax
it with a paste or liquid wax. Remember, spray cleaner or wax don't clean as well. Scrub the bottoms of doors, which can get coated with grime. Also, make sure to clean the window channels and apply a silicone spray, which repels dirt and lubricates the surfaces so the windows will operate smoothly. |
| -
Place baking soda refrigerator packages in the interior and trunk areas. - To keep insects and vermin out of the car, put a plastic bag over the air cleaner/air inlet and exhaust pipe(s). You also can cover these with aluminum foil and tape securely. Place mothballs in the tailpipe and around the outside of the car, or insert steel wool in the tailpipe. - Place the vehicle on jack stands. This step avoids tire flat spots and adds longevity to the suspension because it is not supporting the vehicle's weight during storage. - For your battery, take one of the following actions: Unhook the battery by removing the negative cable first and store it separately - never on a concrete floor and preferably where it will not freeze; or leave the battery in the car and put a battery tender on it, if there is power available. That way if you want to start it a few times in the winter you don't have to put the battery in and out. - Close all of the windows. - If the vehicle will be exposed to freezing temperatures, be certain no personal items that may freeze or burst are left in the vehicle. |
| Before
you put the car away, make sure you spend time cleaning out the storage area.
In the case of a garage, sweep the floor, to make sure you get rid of any traces
of dust, dirt and animals, insects or rodents, as the latter often like to make
classic cars their home during winter. It's also preferable to store the car in
a place where it will remain relatively undisturbed during the winter months-someplace
where the door isn't being constantly opened and closed and daily driven cars
aren't regularly being parked in the same location. The latter is particularly
bad, because if said vehicles are used in the snow and slush, parking them in
the garage overnight, leaves excessive amounts of salt and moisture behind, which
provide the ideal environment for things to start rusting. Even if the car is parked in garage with a concrete or laminated floor, a good idea is to place plastic sheeting, or at the very least, old carpet on the floor, over the area where your classic will be stored. This will reduce the risk of moisture rising from the floor, which can cause rusting on the car's underbelly, exhaust, suspension, brake and driveline components. If you can afford it, a drive-on car cocoon that completely encases the car and zips up like a tent is a very good idea, as it makes for a dry, virtually moisture free sealed chamber while the car is in storage. To prevent further moisture and critters from making in-roads, make sure you fill the ends of the tailpipes with oily rags, or preferably, steel wool. |
| Before
Storing your Car Select a dry, dark location for storage - preferably with limited access. Concrete flooring is best at keeping away moisture. If you must store your car on a dirt floor, place a plastic barrier under the vehicle, and place carpet pieces or plywood under the tires. Give the vehicle a good wash/wax. Putting on and removing a vehicle cover will lead to unwanted scratches if the car is dirty. Fill the fuel tank (preferably with premium) and add fuel stabilizer. Be sure to run the vehicle to move fuel stabilizer into the carburetor, fuel rails, injectors, etc. The fuller the tank, the less room there will be for air, which carries moisture that can lead to fuel contamination and possibly rust within the tank. Change the oil and filter right before putting away the vehicle. The clean oil will reduce the risk of harmful contaminants working away at your engine during hibernation - and you'll be ready to go in spring. Check the antifreeze. Add air to the tires. If you're storing your car offsite, some insurance companies require you to report the address of the offsite location. Check with your insurer to determine your policy's requirements. |
| Following
the old adage that "if it sounds too good to be true it probably is"
comes the news that regular, proper care and maintenance are what really keep
vehicles going into the high six-figure mileage ranges. Miracle cures, magic fairy
dust, mystery polymers and the like are all fine and good for infomercials, but
most likely won't do much good for your vehicle. We all know somebody "wink, wink" with an older, high-mileage vehicle that just keeps on running year after year---The secret is that there is no real secret to getting a vehicle to last a long time. The difference is maintenance. Regular fluid checks and an almost pious dedication to scheduled lubrication will keep the powertrain going strong. What kind of oil, brake fluid, and grease used is just as important as when it is changed. The best oil in the world will do your engine no good if you never change it. Cleaning and protecting the finishes of the vehicle inside and out will keep things looking good. Paint, plastic, leather, and fabric need help to survive the constant assault of sun and elements. Utilize both of these plans together and you, like your Crazy Uncle Fred, will enjoy happy motoring for a good, long time. |
|
Getting your car ready
for the street after a loooooong winter. |
| The
tightness and condition of belts, clamps, and hoses should be checked by a qualified
auto technician. Have a marginally operating air conditioner system serviced by a qualified technician to reduce the likelihood of more costly repairs. Change the oil and oil filter as specified in owner's manual. (Properly dispose of used oil.) Replace other filters (air, fuel, PCV, etc.) as recommended. Check the condition of tires, including the spare. Always check tire pressure when the tires are cold. Inspect all lights and bulbs; replace burned out bulbs. |
| Carbon
Monoxide can Kill Never use a generator, grill, camp stove or other gasoline, propane, natural gas or charcoal burning devices inside a home, garage, basement, crawlspace or any partially enclosed area. Locate unit away from doors, windows and vents that could allow carbon monoxide to come indoors. Install carbon monoxide alarms in central locations on every level of your home and outside sleeping areas to provide early warning of accumulating carbon monoxide. If the carbon monoxide alarm sounds, move quickly to a fresh air location outdoors or by an open window or door. Call for help from the fresh air location and remain there until emergency personnel arrive to assist you. |
| Accelerate and decelerate slowly. Applying the gas slowly to accelerate is the best method for regaining traction and avoiding skids. Don’t try to get moving in a hurry. And take time to slow down for a stoplight. Remember: It takes longer to slow down on icy roads. If possible, don’t stop going up a hill. There’s nothing worse than trying to get moving up a hill on an icy road. Get some inertia going on a flat roadway before you take on the hill. |
| To have adequate snow traction, a tire requires at least 6/32-inch deep tread, according to The Tire Rack. (New passenger-car tires usually have 10/32-inch of tread.) Ultrahigh-performance "summer" tires have little or no grip in snow. Even "all-season" tires don't necessarily have great snow traction: Some do, some don't. If you live where the roads are regularly covered with snow, use snow tires (sometimes called "winter tires" by tiremakers). They have a "snowflake on the mountain" symbol on the sidewall, meaning they meet a tire-industry standard for snow traction. |
| Pack
a winter survival kit in your car. Have a shovel, windshield scraper and small broom, flashlight with extra batteries, battery powered radio, water, snack food including energy bars, raisins and mini candy bars, matches and small candles, extra hats, socks and mittens, First aid kit with pocket knife, Necessary medications, blankets or sleeping bag, tow chain or rope, road salt, sand, or cat litter for traction, booster cables, emergency flares and reflectors, fluorescent distress flag and whistle to attract attention, Cell phone adapter to plug into lighter. |
| Storage facilities typically require proof of vehicle registration. They may also require proof of insurance, since individual property is not covered by the facility's insurance. Most facilities expect that repairing or extensive maintenance of vehicles will be done elsewhere. When vehicles will be stored indoors over long periods of time, check fuel lines and gaskets, and lay down cardboard or mats to prevent damage to the unit's floor and to watch for wet spots so you know where the leak is coming from. |
| A buyer should always ask for the repair and maintenance records of the vehicle. Sometimes, the paperwork is legitimately not available, particularly on an older car; however, in such a case, the buyer must realize that making a purchase on a car with an unknown service history is a bit like gambling. Records usually show any "Achilles’ heel" on the car that the potential buyer may need to consider in a future budget. |
| When purchasing a classic car, a buyer should be knowledgeable about the particular model he or she wishes to purchase. When all the available options are known, a buyer is then able to make a qualified appraisal of the authenticity of the vehicle in question, and make an educated purchase. |
| As classic cars are no longer being manufactured, it is obvious very difficult to find their parts. When a car owner does find a part, it may not always be appropriate for their cars or may come at a very expensive price. Even if they do manage to buy the right piece, they have to exert even more effort to look for people who actually know how to install the parts. The best places to find parts are from an old Mechanic’s shop, On-Line Ads or by using classic car forums and/or club web sites. |
| Duct
Cleaning Use compressed air from a small, portable compressor is an easy way to blow dust and dirt out of heating and air-conditioning duct work. The trick is to aim the high-pressure air at the walls of the ducts behind the vent grilles, where dust and dirt stick and cause musty smells. |
| Shampoo the carpets and seats if they're looking bad. Sometimes dirty upholstery can lead to bad smells, because things get trapped in the fibers. Make your own carpet cleaner by pouring 1/4 cup bleach-free grease cutting dish soap and 1/4 cup of white vinegar into a spray bottle and filling it up the rest of the way with hot water. Spray the carpet with the solution and scrub it with a clean nylon brush dipped in hot water to make it foamy. Use a wet/dry vac to vacuum up the foam; leave the windows down for the car to air out while everything dries. |
| When
taking your baby out of storage, start the engine Let your car run for 20 minutes in order to warm up. Look for any warning lights on your dashboard. Also, check the brake pedal to make sure it feels normal. The brakes could respond noisily after storage if rust accumulated on your car's brake rotors. This brake noise is normal and should go away quickly. |
| Park the car in (hopefully indoor) your storage area. If you are storing the car in an area with an earth or gravel floor, lay a big piece of plastic down first, then drive the car onto that. The plastic sheet will provide a vapor barrier and help keep the car from rusting. Or, for the best combination of floor protection and car protection, use one of our Oil Absorbing Mats. |
| Sandpaper
Storage Tip A simple method of keeping your sand paper organized. Go to your local office supply store and purchase an expandable file (accordion file). Most are made of cardboard, but the one I like is made from plastic. It should last a little longer. Add labels where appropriate and put your sand paper into each slot as required. It's easy to carry around and keeps it flat. |
| Gasoline is made of organic compounds that change over time. What was once a substance that, when mixed with oxygen, provided power for an internal combustion engine, instead becomes a substance that can form a gummy residue or take on a varnish-like quality that can clog up fuel lines. However, if you know that you have gasoline that will not be used for at least 2 months, you can preserve it by adding fuel stabilizer. This will not only preserve the gasoline, but it will also help prevent damage occurring to your fuel system from degraded gasoline. |
| You can't allow any critters that make their way into your storage area to make your classic its home for the Winter! Seal up any drafty doors or windows, and place some rodent control devices throughout the area. Remember, mice run straight lines along wall edges, so a few well placed traps around the perimeter of your classic will help deter any unwelcome guests. We've all heard the horror stories of chewed wiring and a dead mouse in the vent system! I'll usually cover the exhaust tips with a thick sweat sock to help protect the chrome finish and some steel wool to stop rodent access to the exhaust pipe. |
| While
tire dressings make tires look great, they can accelerate deterioration with
foreign materials that can decrease the effectiveness of tire compounds that resist
ozone cracking or weather checking. Any tire that is more than 5 years old should be carefully inspected for cracking and probably be replaced, even if it has acceptable thread left. |
|
Carpet Stains and Freshening |
| How
to clean bird droppings |
| Is
your car bad on gas? By checking and maintaing your tire pressure you can see gains of 10% better fuel mileage and extends the life of your tires. |
| - Baby Wipes are good for quick clean-up of spills, especially on vinyl - Woolite mixed 6:1 with water makes a great, inexpensive interior cleaner that's also safe for leather - Follow-up leather cleaning with a leather conditioner - there are several good ones on the market; I prefer Zaino's, but check your local auto parts store; you can't go wrong with just about anything from Meguiars |
| Check
radiator and gas caps – Tight fitting caps on the radiator and gas tank
are important. Radiator caps can corrode and deteriorate, so it’s a good
idea to replace yours as often as you flush the cooling system. |
| General overall cleanliness of your engine is the best preventive maintenance you can perform on your car. A clean engine runs cooler and is much less likely to cause premature failure of other parts. It's also easier to work on. Regular routine replacement of all filters, lubricants, coolant and the other parts noted here is critical. Use the mileage guidelines shown as your benchmark. Sensing and mechanical tolerances have become so tight even slight variations can create drastic performance changes. Know your car's systems and particular requirements before starting any project. Do not attempt to fix what you don't understand. Remember that some improvements may not take effect right away if your car's computer is designed to learn and adjust. The computer may need to see various parameters before making any permanent setting changes. |
| You can use dishwashing soap, it does not "strip" wax off cars. Many use Liquid Ivory exclusively on all their cars. Several national champions, 40 year old original paint, and daily drivers. The act of washing with ANY product will take a little bit of your wax off. That is what it's designed to do! Wax is supposed to slowly wear off to keep dirt from embedding in your paint. That is why Carnuba is such a great product. Every time you wipe, wash, rinse etc your car, you strip wax. It's going to happen no matter what you use. |
| There are lots of polishing products on the shelves these days. Unfortunately, not all the companies making these products speak the same language. Polish and a polishing compound may not be the same thing. Some may say they are fine for all paint, or new paint or faded paint. Some are liquid, some are wax some are waterless. Rubbing compounds come in liquid or paste. Liquid is easier to apply, but you won’t get as much compound for the money. Stop! Read the label. If you can’t tell if the polish has abrasives or not, then don’t buy it. Find the right polish that will be right for your car. Weather you’re using an abrasive hand-applied polishing compound on severely faded paint of a nonabrasive polish on clearcoat, work in the shade or in a garage. Apply the polish to a small area and use a supplied applicator or a piece of terrycloth. Follow the package directions. Some use water, some don’t. If you are using an abrasive compound, you will see removed paint on your applicator. |
| Remember,
when you store your beauty for a long winter, make sure the tire pressure is at
the manufacturer’s specification. Since your car/truck is going to sit for
a long time, use jack stands to prevent flat spots on the tires. Also be sure
to check all of the vehicle's fluids including: brake fluid, radiator level, power
steering and transmission. We also recommended changing the oil and filter. Finally,
do a thorough visual inspection of the car to make sure there are no signs of
premature wear. Pull the tires and check the brakes and rubber flex lines. |
| Beware
the wet thumb |
| Protect the paint. Give the vehicle a good washing before it's put away for the winter to remove any road salt or grunge, and be sure to dry it thoroughly, too. Then apply a protective coat of wax. Finally, slip on a breathable cloth car cover. (Plastic covers will trap condensation and provide a fertile breeding ground for rust.) |
| Place a couple of mothballs in the trunk, the interior, and the engine compartment. Hopefully this will dissuade little furry creatures from building nests. A quality car cover will also help keep the animal kingdom out of your car. An even better solution is to cocoon the car and cover in a Car Pocket. If the car is being stored indoors, crack the windows about 3/8". |
| Maintain
your Transmission |
| Check if your car’s sunroof and windows are tightly shut. Then grab your hose and spray—just lightly—around the edges of the sunroof, windows, and rear deck lid. Stay alert and observe if there’d be weather stripping leaks. If you see some, better patch or replace the weather stripping right away. Though you could always avoid spraying on or near the leaking areas, it’s always better to be preventive and safe than pissed and sorry when something untoward happens. |
|
Fill up with a lower-octane gasoline. Buy the lowest grade or octane of gasoline that is appropriate for your car. Unless your car requires premium gasoline, filling up your car with high-octane fuel is a waste of money. That pricey premium fuel won't boost your car's fuel economy or performance in the least, so skip it. If you're not sure what grade of fuel works best for your car, open up your owner's manual and take a look. As long as your engine doesn't knock or ping when you fuel up with regular unleaded, you're good to drive on this much cheaper gas. Passing on pricey premium gasoline could save you hundreds of dollars a year. |
| Fix
bad Weatherstripping Immediately |
| Wow,
My Car Stinks… Use a soft cleaning cloth to wipe every plastic, wood, glass, and metallic surface inside the car. If you want to use anything other than warm water, rely on mild detergent as it will be safe for most surfaces, and glass cleaner for glass. For leather seats, use an appropriate leather cleaner. Alternatively, you can ask for a suitable interior car cleaner at your automobile store. If it's a really hot day, leave the doors and windows open to let the car cool down first or it'll be hot and unpleasant as well as super odorous! Don't forget to clean the back or trunk (boot) of the car as well. The odor could be coming from anywhere. If there still is an issue, check the driver and passenger... |
| Combat
Rising Gas Prices Not only do regular tune-ups prevent unwanted breakdowns, they also help you save money on gas. Some mechanics estimate that a poorly tuned engine can use up to 50 percent more gas than one that is running well. As gas is by no means cheap these days, why would you want to fill up your engine twice as often if you could have prevented it? |
| A.
Never apply wax onto surfaces that cannot be easily buffed. B. Ideal waxing temperature is between 55F - 85F. C. Always apply paste wax in thin coats. D. Soft terry cotton makes perfect polishing cloths. E. Do not apply wax in direct sun (unless you are using ICE(r) Synthetic Liquid or Paste Polish) on dark finishes, this makes polish and wax removal difficult. F. Only wax a recently washed surface. |
|
A radio antenna will slide up and down easier if a coat of wax is applied occasionally. Wax paper works great for this job. Rub the wax paper up and down the antenna, the wax from the paper will coat the antenna. Drop a business card (or file card with your name on it) down the window slot in case you ever need to prove ownership. Line your car trunk with a plastic rug protector to protect the carpeting. It will make clean up easier if dirty or greasy objects are placed in the trunk. Prevent rust by keeping the underside of your car clean also. Place a lawn sprinkler under your car and turn on full blast. Move occasionally so it will reach all areas. This is a good way to remove all salt and road grime. |
| Here's
how to make your own Winter Weather Survival Kit: |
|
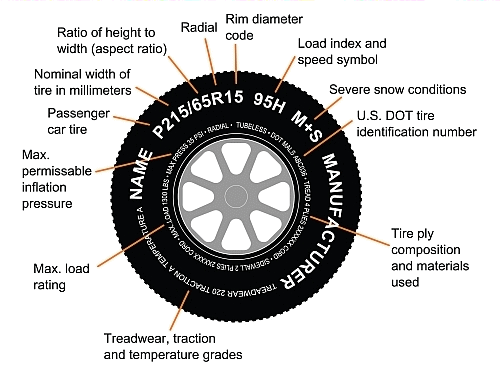
Tire Codes
|
| Fuel
Economy Scams |
| Keep
Leather from drying out and cracking |
| Don't forget the little things you can do to keep your car cool. Park in the shade whenever possible, consider buying a sun shade for the windshield to reflect light if the vehicle must be parked in direct sunlight, and leave the windows cracked so hot air can escape. |
| Make sure the Brake and Clutch master cylinders are full of brake fluid. Brake fluid can absorb water very quickly. By reducing the exposed surface area of the fluid, the water absorption can be reduced. If you can, bleed the brake and clutch systems. It is recommended that you do this on an annual basis anyway, to purge the system of old and possibly contaminated brake fluid. |
| Drive
with Care Everyday
|
|
Bright Sun Tips
- Make sure you wax your car before the temperature soars too high. |
| 1)
Vacuum in hard to reach places if you get yourself a length of hose pipe. Your
hose pipe is probably long enough that you can spare 20", all you need to
do is place one end of the hose between thumb and fore-finger and cup your hand
over the nozzle of the vacuum cleaner. This narrow extension not only enables
you to get into those hard to reach areas down the side of the centre console,
but it actually has more suck. 2) Use baby wipes on car dashboards, they clean like new and leave an anti-static layer. 3) For detail cleaning on the dashboard, the best thing to use is a soft paintbrush. It gets into all the grooves. 4) If you have ink stains on the leather, you can remove it with cuticle remover -- not nail polish remover! Just put some on the stain and let it set in anywhere from 10 minutes to overnight and then wipe it off. 5) A big old soft sock makes a perfect hand mitt for buffing the wax on your car. 6) When your windshield starts blurring when you turn the wipers on, dampen a cloth or rag with some full-strength white vinegar and run it down the full length of each blade once or twice. 7) To help restore a license plate that is beginning to rust, spray it with WD-40 and wipe with a clean rag. This will remove light surface rust and will also help prevent more rust from forming. 8) Freshen up - To rid of stale odors from the ventilation ducts, try spraying odor eliminator into the system's air intake, which is usually located at the base of the windshield. Then run the air conditioner full blast for at least 10 minutes. 9) Battery Cleaner (Removes built-up acid) Baking soda and Water Sprinkle baking soda onto battery terminals. Spray with water to dampen. Let set for about one hour. Sponge off with water. Air dry. 10) Engine Degreaser: ¼ cup washing soda and 1 gallon warm water pour on engine areas that need degreasing. Rinse thoroughly. Excess should not be stored -- discard all leftovers. |
|
The top 5 reasons you
may want to consider changing your oil more frequently if: |
| 1.
To keep your headlights clear, wipe them with car wax. The water repellents
in the wax will work to keep the slush and salt from accumulating on the headlights. 2. Ice-proof your windows by spraying them with a vinegar mixture at night. Use 3 parts vinegar to one part water. If there is already ice on the windows, spray with the mixture to melt it off. 3. Prevent your car doors from sticking by spraying the rubber seals around the doors with cooking spray and rubbing it in with a paper towel. This will prevent the water from melting into the rubber therefore it wont freeze at night. 4. Use shaving cream to prevent your windows from fogging. Spray some on the inside of your windows then wipe off with paper towels. Apparently, shaving cream contains some of the same ingredients as commercial defoggers. 5. If your windshield wipers are leaving streaks or squeaking, wipe them with a cloth saturated in alcohol or ammonia. The build up of grease and grime can be cut by these two solvents. It restores wipers to near perfect clarity. 6. De-ice a lock with hand sanitizer gel. It contains alcohol which is the main ingredient in commercial de-icers. Put the sanitizer on the key and the lock. The gel must contain at least 60% alcohol or it wont work. The same holds true for sanitizing the hands, anything less than 60% and you're wasting your money. 7. Stuck in the snow? use your floor mat. Turn off the car, put the rubber side of the mat under the spinning tire. Turn the car back on, step on the gas and it'll give you the grip you need to get moving again. |
|
Don't fill up if you
see the tanker Keep
the Moisture out Keep
the Critters out Ahhh, about
your Rear End |
| Drive
with care everyday - Accelerate slowly when you begin your drive.The most wear to the engine and drive train occurs in the first ten to twenty minutes of operation. - Warming the engine by letting it idle in the driveway is not a smart idea. The engine doesn't operate at its peak temperature, resulting in incomplete fuel combustion, soot deposits on cylinder walls, oil contamination, and ultimately damaged components. - Put less strain on your engine and automatic transmission by shifting to neutral at red lights. Otherwise, the engine is still working to push the car even while it's stopped. - Avoid driving at high speeds and accelerating quickly, especially when it's very hot or very cold outside. Such driving behavior will result in more frequent repairs. - Extend the life of your tires with careful driving. Observe posted speed limits. Avoid fast starts, stops, and turns. Avoid potholes and objects on the road. Don't run over curbs or hit the tire against the curb when parking. And, of course, don't burn rubber. - When turning your steering wheel, don't hold it in an extreme right or left position for more than a few seconds. Doing so can damage the power-steering pump. - Consolidate your short driving trips. Most of the wear and tear -- as well as the pollution your car generates -- takes place in the first few minutes of driving. Doing several errands at once, during low traffic hours if possible, will keep your engine happier longer. |
| Reassembly:
Keep From Nicking Those Newly Painted Car Doors Before attempting to mount your doors, gently adhere masking tape to the outside edges of the doorjamb area on the body. This will help prevent the door's sharp edges from getting nicked or scraping the paint off the jamb edges. The tape can be removed as soon as the door is mounted in place. Now it's time for the floor jack. Car doors are quite heavy and bulky, so it is a big mistake to try holding one in space while aligning to the hinges. Even with a helper holding one end of the door, this job almost always ends up with damage. It's just too hard to keep the door aligned while fighting with its weight. Here's a better way. Take a scrap piece of 2x4 and wrap it with a towel. Place the piece on your floor jack and raise the jack to the approximate bottom height of the door. Lay the door's flat bottom onto the wrapped piece of wood, taking the time to balance it. Now all you have to do is keep the door from falling off, which is easily done with one hand. Position the jack such that you can roll the front of the door up to the hinges and then adjust the height until the door can be pushed into place. You will find this very easy to do because there is no physical effort on your part. This will allow you to be patient. |
|
Preserve your car during
long-term storage |
|
Be patient during the
break-in period |
| Lighten
up your Key Chain Does your car key share a chain with a dozen or more other keys? That's a pretty heavy load hanging off the car key when it's in the ignition. The weight, combined with bouncing while you drive, can wear out the tumblers inside the ignition and eventually lead to ignition switch failure. To add years of service to your ignition switch, purchase a lightweight key chain that allows you to separate your ignition key from the others. Drive with only the ignition key in your ignition. If your ignition key "sticks" when you try to turn on the car, it's a warning that your ignition switch is about to fail. Replace it before you get stranded. |
| Use
Upholstery Cleaners on soiled seats |
| Keeping
Track of Flaws We find that there is one sure way to "remember" those flaws. We've used it for many years and it's never failed to help us take care of defects without losing them. It's also about as cheap a solution as can be: chalk. That's right; just keep a stick of chalk (any color) in your hand as you inspect the body of a car or just a single panel. When you find a flaw simply circle it with chalk. Later, when you come back to fix all the defects you can wipe the chalk away as you go, or wait until you wet-sand the surface. Chalk doesn't mar any finish and doesn't chemically react with undercoats or top finishes. Unlike other methods (bits of masking tape, dabs of white-out, post-its) that might leave a blush in the paint, chalk just goes away during surface preparation. |
| Don't
Struggle With That Hose! Sometimes putting on a new radiator hose can be a monumental task. Stretching and pushing the hose end over a water pump bib or radiator outlet can take all the energy you can muster, not to mention result in skinned knuckles. There's got to be a better way, right? Yes, there is, so bear in mind that rubber needs two conditions to allow it to flex and stretch: temperature and lubrication. Cold rubber doesn't stretch very well, so keep the hose indoors overnight before you attempt to put it on the fitting. Alternatively you can heat it (carefully!) with a heat gun or just put the end in your pocket for a while. Lubrication is essential to get a hose to slip over a connection. The best materials to use are silicon lubricant, soapy water or Armor All. Just wet down the inner surface of the hose and push away, being careful not to bend or otherwise damage delicate copper, aluminum or plastic hose fittings. Don't use petroleum-based grease or oil. It might react with the rubber eventually and cause failure. |
|
Don't Just Pull That
Tape! Yes, we should have used special masking tapes that are designed for such applications, but there wasn't any on hand. We took the risk and paid the consequences alright, but isn't there some way to get that "normal" masking tape off without damaging the nice finish? Yes there is, and it's just a few feet away from you. It's a heat gun - or hair blower if you don't have a heat gun. All you need to do to remove masking is to gently (GENTLY!) heat the tape as you pull it away. The adhesive will soften enough to prevent pulling the paint off, leaving just a little film that can be cleaned off with a mild solvent or waxing. This technique is great for removing tape that's been on surfaces for a long time, too. We've tried it on tape that was wrapped around some parts that had been stored for over 5 years and it came right off! |
| Don't
Scratch Those Fenders! That's why we think there's a better way to go about protecting the fenders. The answer for us is binder clips (spring-type paper clips)! Yes, these little black spring clips are terrific for use in protecting your fenders - or anywhere else for that matter. Instead of a fender protector we use an old blanket or bedspread. We fold it over and lay it on the fender, clipping it to the flange around the hood opening area using the binder clips. It's quick and easy and offers the advantage of being able to shake the dust and dirt out of the cloth, or even washing it when it's really dirty. |
|
Whitewall Tire Trick This started a cleaning process that frustrated us for quite a while. First we scrubbed the whitewalls with Dobie pads and spray cleaner and got nowhere. There was no improvement, so next we got out the SOS pads and scrubbed away. That too yielded no improvement, so we started to assume that the discoloration was all the way through the whitewall. To address this situation we tried cleaning areas of one whitewall with solvents. First we tried PrepSol and then lacquer thinner. We also tried to scrub the areas with steel wool and solvent, once again to no avail. We were running out of ideas and resigning ourselves to having dingy whitewalls and decided to clean up all the stuff and go away. Just before leaving we thought that maybe it would be worth sanding the outer layer of white to see if the color was penetrating all the way into the rubber. We then tested a small area by sanding with 150-grit wet/dry paper and, much to our surprise, a rubbery brown material started sanding away, revealing a much whiter layer. We sanded some more and found that the whitewall was, well, white! We got a bucket of water and more sandpaper and set out to sand all four tires. One hour later we had sanded off the dingy layer and had four sparkling white tires! What the material was and why it wouldn't come off with steel wool or solvents is beyond us, but now the tires look great and clean up with the more conventional methods. Who'd have thought? |
|
Those Darn Metal Shavings! We've tried wiping the shavings off and in the process learned the importance of using work gloves. This technique works, but the gloves get filthy and the shavings tend to cut and shred the material. Blowing the shavings off with compressed air works too, but that just scatters the shavings around your garage. Better yet, why not wrap the magnet in plastic wrap? A couple layers of plastic wrap will last quite a while and when the shavings get piled up the entire wrap can be peeled off and discarded. An alternative to this technique is to use a ziplock bag for the same purpose. Either way, these little tricks make life a bit easier. |
| Storing
That Respirator Many don't know that leaving a respirator out on the counter or hung on a hook causes the cartridge to become saturated. Air moves in and around the cartridge and, over time, a perfectly good cartridge becomes unusable. That's why replacement cartridges are kept in sealed containers. We find that the best way to prevent premature cartridge failure is to keep the respirator in a large ziplock freezer bag. These bags are inexpensive and do a very good job of sealing the respirator from outside air and other chemical contaminants. It also keeps the respirator free from dust while it sits around the workshop. |
| Storing
small parts for your classic car project Usually we write our labels directly on the bag with a felt-tipped pen. However after an extended time, moving parts around causes the labels to wear off. A safer idea is to write your label on an index card and put it in the bag with the part. |